You’ve unboxed the board, found the pump in the carry bag, and now you’re staring at a coiled hose, a pressure gauge, and a black rubber valve cap on a folded sheet of PVC — wondering if you’re about to do something wrong. Maybe you’ll over-inflate it. Maybe you’ll snap something. Maybe the pump won’t even fit the valve correctly.
Take a breath. I’m Allen, Senior Industrial Designer at ABYSUP — I’ve spent nearly a decade designing the boards, the valves, and the pumps that come with them, and I can tell you the most common feedback we get from first-time inflators is the same: “That was easier than I expected.” The system is built for someone who has never done this before. Follow the seven steps below and you’ll be on the water in under ten minutes.
Before You Pump: The 30-Second Valve Check
Before the pump even comes out of the bag, do this one check. It takes thirty seconds and prevents 90% of first-time confusion.
Find the valve on your board — it’s the round black or grey housing near the tail, with a screw-on cap. Unscrew the cap. Inside you’ll see a small spring-loaded pin in the center. Press it once with your fingertip. It must spring back up. That up position is “closed” — air goes in but doesn’t come out.
If the pin is stuck in the down position, press it gently and rotate it a quarter turn clockwise. It will pop up. That’s your valve set to inflate. Down means deflate, up means inflate — that’s the entire valve operation memorized.
This is a Halkey-Roberts style high-pressure valve — the same design used on inflatable life rafts and commercial-grade marine equipment. It’s rated well beyond the pressures you’ll ever generate with a hand pump, and the double-seal geometry means it physically cannot leak when the pin is up. You cannot break it by checking it. Press the pin a few times if you want to see how it moves. The valve will be fine.
“We had a customer email us last spring convinced his valve was ‘making a hissing noise’ after the first inflation. I asked for a video. The hiss was the gauge needle settling — exactly what it’s supposed to do. He felt embarrassed; I told him every single first-time inflator hears that same sound and worries. The valve was perfect.” — Allen Xiao, ABYSUP Design Team
The 7-Step Inflation Walkthrough
Lay the board out flat on grass, sand, or a clean surface. Have the pump within arm’s reach. Then go in this order:
Step 1 — Unroll the board fully
Don’t try to inflate a partially folded board. Lay it out flat with the deck (the textured top side) facing up. The valve should be on the deck, near the tail. Time: 30 seconds.
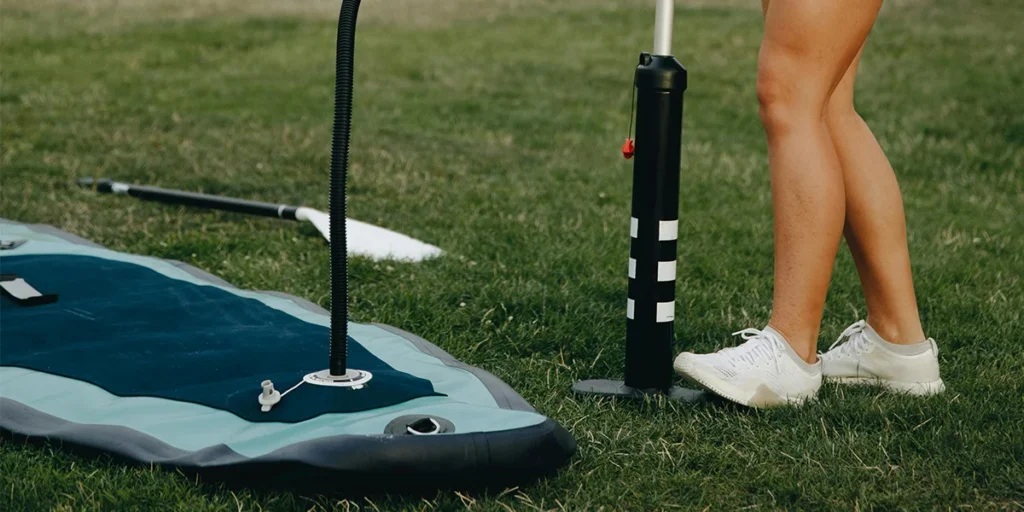
Step 2 — Connect the hose to the pump
The hose screws into the threaded port on top of the pump cylinder. Hand-tight is enough — no tools needed. If you see a second port labeled “deflate” or marked with an arrow, ignore it for now. You want the inflate port.
Step 3 — Connect the hose to the valve
With the valve pin in the up position (you checked this in the previous step), press the hose nozzle straight down onto the valve and rotate clockwise about 45 degrees to lock it. You’ll feel a positive click. Give the hose a gentle tug — if it doesn’t pull off, you’re locked in. Time: 15 seconds.
Step 4 — Pump in dual-action mode (0 to about 7 PSI)
Look for a small lever or switch on the pump base. Set it to dual-action mode — sometimes labeled “I” or “high volume.” In this mode, the pump moves air on both the up and down stroke, filling the board fast with low effort.
Stand with your feet shoulder-width apart, the pump between them, and use your body weight rather than just your arms. Long, smooth strokes — full extension up, full compression down. You’ll feel the board firming up under your feet. Keep going until the gauge needle starts to move (around 5–7 PSI). Time: 3–4 minutes.
Step 5 — Switch to single-action mode (7 to 15 PSI)
Once the gauge starts reading, the dual-action mode will get noticeably harder. This is when you switch to single-action. Move the lever to position “II” or “high pressure.” Now the pump only moves air on the down stroke, but each stroke pushes much harder against the back-pressure inside the board.
This is the part that surprises first-timers — the pump suddenly feels lighter again. That’s not a malfunction. That’s the design working. Keep going with steady down-strokes until the gauge reads 15 PSI. Time: 3–4 minutes.
Step 6 — Disconnect the hose
Once the needle hits 15, stop pumping. Rotate the hose nozzle counter-clockwise about 45 degrees and lift it straight up. You’ll hear a brief hiss — that’s the tiny bit of air between the valve and the hose escaping. The valve closes the moment the hose disengages. Almost no air is lost.
Step 7 — Cap the valve
Screw the black cap back onto the valve, hand-tight. The cap is a secondary protection layer — the valve itself is already sealed, but the cap keeps sand, salt, and grit out of the mechanism. Total time: 7–10 minutes for most first-timers, dropping to 5–6 minutes once you’ve done it a few times.
Reading the Gauge: Why 15 PSI Is the Right Target
The pressure gauge sits on top of the pump, with a needle and a colored dial. Most first-timers fixate on it — and for good reason. It’s the only number that tells you whether the board is ready.
Our boards are designed and tested to operate at 15 PSI. The maximum safe pressure printed near the valve is typically 20–22 PSI. Here’s what those numbers actually mean in practice:
| PSI Reading | Board Feel | Recommendation |
|---|---|---|
| 8–10 PSI | Soft, flexes underfoot, slow on water | Under-inflated — keep pumping |
| 12–14 PSI | Firm but slight flex | Acceptable for casual flat water |
| 15 PSI | Rigid, drum-like, no visible flex | Target — paddle here |
| 16–18 PSI | Slightly stiffer, marginal performance gain | Safe but unnecessary |
| 20+ PSI | Maximum stiffness | Not recommended — extra strain on seams over time |
Why 15 specifically? Because that’s the pressure at which our drop-stitch core reaches structural rigidity equivalent to a hard board, while keeping seam stress well within the long-term durability margin. We’ve run accelerated aging tests at 15 PSI, 18 PSI, and 22 PSI continuous load. The 15 PSI samples showed essentially zero seam fatigue at the 5-year equivalent mark; the 22 PSI samples showed measurable creep at the 3-year mark. That’s the engineering reason we don’t recommend chasing the maximum number.
One honest trade-off: at 15 PSI on a hot summer afternoon, the board will continue to gain pressure as the air inside heats up. A board that left the garage at 15 PSI in the morning can easily read 17–18 PSI by midday on a 32°C day. That’s still well within the safe zone. Don’t over-inflate to compensate for cool morning temperatures. Pump to 15, paddle, and let physics do its thing.
For a deeper look at how pressure relates to inflatable structure rigidity, drop-stitch construction is the underlying technology that makes 15 PSI feel as stiff as it does — thousands of polyester threads connecting the top and bottom layers, each one engaged the moment pressure rises.
What “Fully Inflated and Ready” Actually Looks and Feels Like
The gauge tells you the number. But your hands and eyes will tell you whether the board is actually ready. Here’s what to check before you carry it to the water.
The slap test: Hit the deck firmly with the flat of your palm. A properly inflated board sounds like a tight drum — a bright, clean “thock” with no give. If it sounds dull, like slapping a soft cushion, you’re still under pressure.
The press test: Place your knee or your full body weight on the center of the deck. The board should resist with almost no visible flex. You shouldn’t see the underside touching the ground or sagging. If it does, you’re under 12 PSI.
The visual test: Look down the length of the board from nose to tail at eye level. The deck should be almost dead straight — a slight upward curve at the nose (rocker) is by design, but the middle section should not bow downward. If you see any inward dish, keep pumping.
I had a parent at a dealer demo day last summer ask me how she’d know her son had inflated his birthday board correctly when she wasn’t there to supervise. I told her the slap test. She picked it up after one demo and now uses it as her go-to check before every family session. If a non-paddler can learn it in one minute, your fourteen-year-old can definitely learn it.
Once all three checks pass, you’re ready. Carry the board to the water with the deck facing up, leash attached to the rear D-ring, paddle in your other hand. That’s it. You’re ready.
First-Timer Worries (And Why None of Them Will Ruin Your Board)
These are the four concerns we hear most often from new owners. None of them are actual risks.
“What if I over-inflate it?”
The pump physically cannot generate enough pressure to damage the board. By the time you reach 18 PSI, the down-stroke effort is high enough that most adults stop on their own. The board’s rated maximum is 20–22 PSI, and the seams are tested well beyond that. You will tire out before the board does.
“The pump is making a clicking sound — is it broken?”
Almost always no. The clicking is the internal valve in the pump cylinder switching direction during dual-action mode. It’s mechanical, expected, and unrelated to the board. If the pump is producing pressure on the gauge, it’s working.
“It’s getting really hard to pump — did I do something wrong?”
You’ve probably hit around 7–8 PSI in dual-action mode. Switch the lever to single-action (high-pressure) mode and the resistance drops noticeably. That’s exactly what the dual-mode design is for — fast volume early, then mechanical advantage late.
“The hose hissed when I disconnected — did I lose pressure?”
You lost a fraction of a PSI from the air trapped between the valve and the hose. The valve itself sealed the moment the hose disengaged. Re-check the gauge if you’re worried, but you’ll find it reads almost exactly the same.
Frequently Asked Questions About Inflating a Paddle Board
How long does it take to inflate a paddle board?
For a standard 10’6″ inflatable SUP using the dual-action manual pump that ships with our boards, expect 7 to 10 minutes on your first attempt. Once you’ve done it three or four times and have the technique dialed in, you’ll be down to 5 to 6 minutes consistently.
Electric pumps with auto shut-off run slightly slower in pure pumping time — usually 10 to 12 minutes — but they require zero physical effort. The real advantage of an electric pump isn’t speed; it’s that you’re not winded before you’ve even started paddling. For families inflating two or three boards at a trailhead, the electric pump pays for itself the first time you use it.
What PSI should I inflate my paddle board to?
Inflate to 15 PSI. That’s the design target for our boards and for most quality inflatable SUPs on the market. At 15 PSI the board reaches full structural rigidity, glides cleanly on the water, and operates well within the long-term seam durability margin.
You can technically pump higher — most boards have a maximum rating of 20–22 PSI — but you won’t gain meaningful performance, and you’ll be putting unnecessary stress on the seams over years of use. Pump to 15, then stop. The extra effort isn’t worth it.
Can I over-inflate my paddle board with a hand pump?
Practically speaking, no. Manual hand pumps are designed so that the physical effort to push past 18 PSI is high enough that most users stop naturally before reaching the board’s maximum rating. The board’s seams and drop-stitch core are tested to pressures well above what the pump can deliver.
If you’re using an electric pump, set the auto shut-off to 15 PSI and the pump will stop on its own. The only way to actually over-pressurize a quality inflatable SUP is to ignore the gauge while running an unattended electric pump with no shut-off — which isn’t something any of our pumps allow.
Why is my paddle board pump suddenly so hard to push?
You’ve reached the pressure threshold where your dual-action pump’s effectiveness drops off — usually around 7–8 PSI. Look at the lever or switch on the base of the pump. Move it from position “I” (dual-action, high volume) to position “II” (single-action, high pressure). The pump will feel light again on the down-stroke.
If the pump is genuinely stiff in both modes from the start, check that the hose connections are tight and that the valve pin is in the up position. A loose hose or a valve set to deflate will make the pump feel like it’s working against nothing.
What happens if my paddle board sits in the sun after inflating?
The air inside expands as it heats up, which raises the pressure inside the board. A board inflated to 15 PSI in cool morning air can read 17–18 PSI by midday on a hot summer day. This is normal and within the safe operating range — our boards are tested for exactly this scenario.
That said, if you’re leaving the board on a hot beach for several hours unused, it’s good practice to release a little pressure (press the valve pin briefly) before storage. Don’t leave a fully-inflated board in a closed car trunk on a hot day — that’s the one scenario where ambient temperature can push pressures uncomfortably high.
Ready for Your First Session
Every ABYSUP board ships with the dual-action pump described in this guide — same lever, same gauge, same hose threading across the lineup. There’s nothing extra to buy on day one. The pump that came in your box will inflate your board to 15 PSI in under ten minutes, every time, for the lifetime of the board.
If you want to see our full pump range — including our electric high-pressure auto-shutoff model for families and dealers running multiple boards — visit our SUP pumps collection. For replacement hoses, gauge units, or spare valve cores, the same page covers those parts.
Wholesale and dealer inquiries: our team works directly with regional distributors on volume pricing for pumps, accessories, and full board kits. Reach out through the trade contact form and someone from our team will respond within 48 hours.
Whether this is your first inflation or your fiftieth, the process is the same. Valve up, hose locked, pump steady, gauge to 15. That’s it. You’re ready.