You’ve had a perfect session. The board is dry, the sun is dropping, and packing up should be the easy part. Instead you’re on attempt three — board rolled, paddle wedged in sideways, pump on top, zipper grinding against fabric and refusing to close. By the time you force it shut you’re more tired than you were on the water.
I’m Allen, Senior Industrial Designer at ABYSUP — I’ve spent nearly a decade designing not just inflatable SUPs but also the carry bags they live in. And here’s what nobody tells you at unboxing: the bag isn’t too small. The order is wrong. Pack in the right sequence and a bag that felt impossibly tight on day one closes with room to spare on day two.
This is the exact five-step sequence we use in our own warehouse, at dealer demo days, and at the end of every product testing session. Two minutes once you’ve done it twice.
Why Packing Order Matters More Than Bag Size
The carry bag for an inflatable SUP is sized with very little spare volume by design. Every cubic centimeter of empty space inside the bag is wasted weight on your back and extra bulk in your trunk. A bag with 20% spare volume is a bag that’s too big — it sags, it shifts, and the board flops around inside as you walk.
Our bags are tuned so that when correctly packed, the contents fill the volume and the compression straps can pull the whole load tight. That tightness is what makes the bag carry comfortably and stack neatly in a car boot. But it also means there’s no slack to forgive a wrong sequence.
Most first-time packing failures come down to one of three errors:
- Rolling the board too loosely — the roll diameter ends up wider than the bag opening
- Putting the paddle in before the board, which forces the board to wrap around the paddle sections instead of sitting flat
- Trying to fit the pump inside the main compartment instead of attaching it externally
Each of these is fixable in about ten seconds once you know the right move. Together they’re the difference between a bag that closes easily and a bag you fight every weekend.
The 5-Step Packing Sequence
Lay the bag open on a flat surface — grass, sand, deck, the boot of your car. Have all the components within arm’s reach. Then go in this order:
Step 1 — Deflate fully and remove the fin
Open the valve and let the board deflate completely. Don’t rush this — a half-deflated board will spring back as you try to roll it, and the trapped air will defeat your compression. Walk away for a minute if you have to, then come back and press the deck flat with your hands or knees to push the last of the air out.
Then remove the central click-fin. Drop it in the front pocket of the bag now, while you’re thinking about it. Fins left attached to a folded board create stress points and imprints in the PVC over time — that’s a long-term durability hit you don’t want.
Step 2 — Roll the board tightly from the nose
This is the step that determines whether everything else works. Lay the board flat, deck-side down (so the fin slot points up). Start the roll at the nose — the narrower end — and roll firmly toward the tail.
Why nose-first? Two reasons. First, the nose is narrower than the tail, so starting there gives you a tighter initial roll diameter. Second, the foam-core construction in our boards has the densest material toward the tail — rolling from nose to tail means the firmer end stays on the outside of the roll, which protects the more delicate nose taper from being crushed under tension.
Keep the roll tight as you go. After every two or three rotations, push the roll toward the deck with the heel of your hand to compress trapped air out. The finished roll should be tight enough that it doesn’t loosen when you pick it up by one end. If it does, unroll it and start again — a loose roll won’t fit the bag.
Step 3 — Lay the rolled board into the bag, fin-end first
Open the main compartment of the bag fully. Lower the rolled board in fin-end (tail-end) first, with the rolled axis vertical. The tail end is heavier and more rigid because of the fin slot reinforcement, and it sits more stably at the bottom of the bag than the nose end would.
Push the roll down firmly until it’s seated at the bottom. The roll should fill the back panel of the main compartment, leaving a long narrow channel along one side of the bag for the paddle.
Step 4 — Slide the paddle sections alongside the board
Disassemble the paddle into three sections — blade, mid-shaft, T-grip. Lay them parallel to each other and slide them down into the channel beside the rolled board, blade end pointing down.
The paddle sections should sit flush against the rolled board, not on top of it. If you find yourself stacking the paddle on top, your board roll is too loose and is taking up too much of the compartment volume. Re-roll tighter.
Drop in the leash, the repair kit, and any small accessories around the paddle sections to fill the gaps.
Step 5 — Attach the pump to the external compression strap
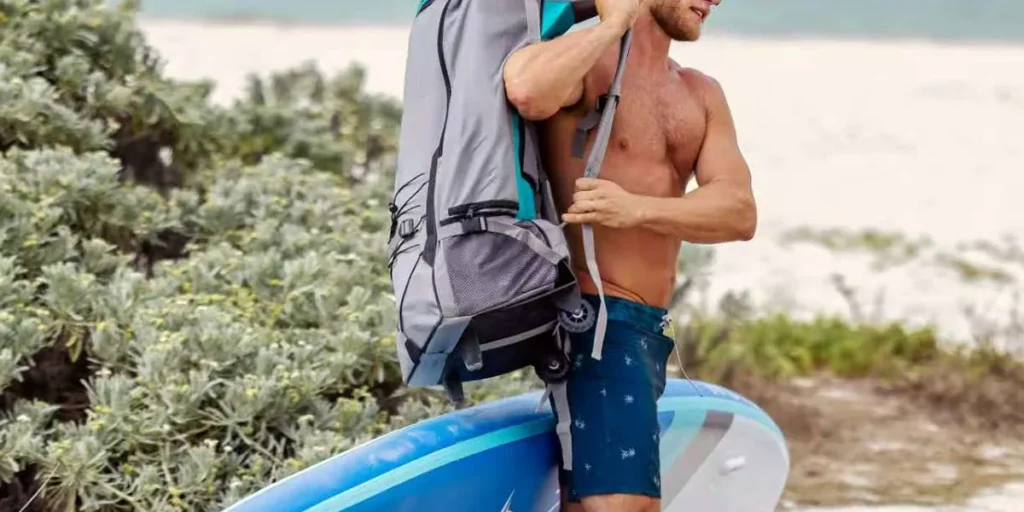
The pump does not go inside the main compartment. It attaches to the external compression strap on the front or side of the bag — depending on your bag generation, you’ll see two webbing loops or a dedicated pump sleeve. Slide the pump shaft through the loops and cinch the strap down.
This is a deliberate design choice. The pump is the most awkwardly shaped component, and forcing it inside the bag eats volume that the rolled board needs. Putting it outside also means you can grab it first when you arrive at the water — which is the order you’ll actually use it. Total pack time after step five: roughly 90 seconds once you’ve done it twice.
The Roll: Why “Tight from the Nose” Is the Whole Game
If you only remember one thing from this guide, make it the roll technique. Every other step is forgiving. The roll is not.
Here’s the difference a good roll makes in measurable terms. We tested this during product development on our 10’6″ all-round board:
| Roll Technique | Final Roll Diameter | Fits Bag? |
|---|---|---|
| Loose, tail-first | ~32 cm | No — bag won’t close |
| Loose, nose-first | ~28 cm | Tight — bulging seam |
| Tight, tail-first | ~26 cm | Fits but unstable |
| Tight, nose-first | ~22 cm | Fits with room for paddle |
That 4 cm difference between a loose nose-first roll and a tight nose-first roll is the entire margin between “bag won’t close” and “everything fits.” It’s not a small effect.
“During the second prototype round on our current carry bag generation, we ran a packing test with eight new ABYSUP staff members on their first day. Same bag, same board, same components. The four who were shown the nose-first tight roll technique averaged 95 seconds to fully pack. The four who weren’t averaged just over four minutes — and two of them gave up on the first attempt because they couldn’t get the zipper closed. The bag wasn’t the variable. The roll was.” — Allen Xiao, ABYSUP Design Team
One honest trade-off worth mentioning: rolling tightly takes deliberate effort the first few times. Your forearms will feel it. After session three or four it becomes muscle memory and you’ll do it without thinking. Push through the first few sessions. The investment pays back every weekend after.
Where Each Accessory Belongs (And Why)
The bag is divided into three zones for a reason — main compartment, front zip pocket, and external strap system. Each one is sized and shaped for specific contents.
Main compartment — board, paddle, leash
The big soft items go here. Board rolled tail-first, paddle sections alongside, leash coiled and tucked into a gap. Nothing rigid or sharp goes in the main compartment. The PVC of your board is rated for compression but not for point loads — a hard-edged accessory pressing into one spot for a long drive can leave a permanent indentation.
Front zip pocket — fin, repair kit, small hardware
This is where the small, rigid items go. Removed center fin, repair kit pouch, spare fin pin, valve cap if you’ve replaced it. The front pocket is sized for these specifically — putting them in the main compartment risks pressing edges into the rolled board.
One pro tip: always put the fin in the bag the moment you remove it from the board. Loose fins are the single most commonly lost accessory in SUP — they end up in grass, in cars, on docks. Treat the front pocket as the fin’s permanent home and you’ll never lose one.
External straps — pump only
The pump is the largest single accessory and the worst-fitting shape for any compartment. Putting it on the outside on a dedicated compression strap solves three problems at once: it preserves main-compartment volume, it makes the pump immediately accessible at the water, and it lets the bag’s load profile stay flat against your back when you carry it.
For households with two pumps (manual + electric), the manual pump goes on the strap and the electric pump rides separately in your car. Trying to attach both is more weight than the strap is rated for.
For more on inflatable equipment design and the engineering trade-offs behind transport bags, the inflatable structures entry covers the broader category — most of the same packing principles apply across kayaks, paddle boards, and inflatable rafts.
Common Packing Mistakes (And the Fix for Each)
Six errors account for almost every “my bag won’t close” message we receive. Each one has a simple fix.
Mistake 1 — Rolling with the board still partially inflated
Fix: open the valve fully, walk away for 60 seconds, then press the deck flat by hand to expel residual air before you start rolling.
Mistake 2 — Rolling deck-side up instead of deck-side down
Fix: always roll with the deck (textured top side) facing the ground. The smooth hull faces outward on the roll, which produces a tighter, more uniform cylinder.
Mistake 3 — Starting the roll from the tail
Fix: start at the nose. Tail-first rolls trap air in the wider end and finish at a larger diameter than nose-first rolls.
Mistake 4 — Putting the paddle in before the board
Fix: board first, paddle second. The paddle slides into the channel beside the board — it doesn’t define the bag’s interior shape.
Mistake 5 — Trying to fit the pump inside the main compartment
Fix: the pump goes on the external compression strap. Always.
Mistake 6 — Closing the zipper from one side only
Fix: zip from both ends toward the middle, or use the dual-slider feature if your bag has one. A single-direction zip puts uneven tension on the seam and is the leading cause of broken zippers in carry bags. Treat the zipper gently and it will outlast the rest of the bag.
Frequently Asked Questions About Packing a SUP Bag
How do I roll an inflatable paddle board for storage?
Deflate the board fully, remove the center fin, lay the board flat with the deck (textured side) facing down, and roll firmly from the nose toward the tail. Press down on the roll with the heel of your hand every two or three rotations to compress out trapped air.
The finished roll should hold its shape when you lift it by one end — if it loosens or sags, unroll and start again with more tension. A tight roll is the foundation for everything else fitting in the bag.
Why won’t my SUP bag close after a session?
Almost always one of three reasons: the board is rolled too loosely, the paddle was packed before the board, or you’re trying to fit the pump inside the main compartment. The first is the most common — a loose roll takes up too much volume and leaves no channel for the paddle sections.
Unpack everything, re-roll the board tightly from the nose, place it in the bag tail-first, then slide the paddle sections alongside. Pump goes on the external strap. The bag will close.
Should I deflate my paddle board completely before packing?
Yes — fully. Even small amounts of residual air will cause the board to spring back as you try to roll it, and trapped air pockets create uneven roll diameter. Open the valve, walk away for a minute to let pressure equalize, then press the deck flat with your hands or knees to expel the last of the air before starting your roll.
Don’t pack a partially inflated board for short transport either. The compression in the bag combined with internal pressure creates seam stress over time, even on short journeys.
Where should I put the pump in my SUP carry bag?
On the outside of the bag, attached to the external compression strap. Every quality SUP carry bag — including ours — has either a dedicated pump sleeve or two webbing loops sized for the pump shaft. Slide the pump through and cinch the strap down.
The pump is the most awkwardly shaped accessory and the one you’ll grab first at the water. Putting it outside the bag preserves interior volume for the board and paddle, and gives you faster access when you arrive at your launch site.
How long should it take to pack a SUP carry bag?
Once you have the technique, about 90 seconds to 2 minutes for a complete pack-down — deflation included. First-time packers typically take 5 to 8 minutes, mostly because the roll and the order are unfamiliar.
By session three or four, the muscle memory builds and you’ll find yourself packing without thinking about it. The bottleneck moves from “figuring out where things go” to just “waiting for the board to deflate.”
Find the Bag That’s Built Around This System
Every ABYSUP board ships with our matched carry bag as standard — sized to the rolled board volume, paddle channel pre-shaped along one side, external pump strap, padded shoulder straps, and front zip pocket sized for fin and repair kit. There’s nothing extra to buy on day one.
If you want to see our full carry bag range — including upgraded wheeled travel bags for paddlers flying with their boards, and replacement bags for older boards — visit our SUP backpack collection. Spare straps, replacement zippers, and accessory inserts are available on the same page.
Wholesale and dealer inquiries: our team works directly with rental fleets and retail partners on volume pricing for branded carry bags and replacement components — useful for any operation managing more than ten boards. Reach out through the trade contact form and someone from our team will respond within 48 hours.
The right bag, packed in the right order, takes 90 seconds at the end of a session. The wrong order takes ten minutes and a lot of frustration. Roll tight, board first, pump outside. Done.